How to run a LLM on your machine
It’s the beginning of 2025. AI and LLM remain the hottest buzzwords in the (tech) industry. The demand for AI-powered applications is at an all-time high. New words like “agentic” are invented. We programmers grind on, hoping we still have a job next year.
Since we (usually) work on private projects, using AI is a bit tricky. While we need (we are expected?) to integrate AIs in our work, we don’t want to let various AIs see our code, data, and keys. A good compromise is to run AI locally on our machines.
The benefits are obvious:
- free to use,
- everything is private,
- can be used offline,
- the number of queries is unlimited!
There are some downsides, of course. We’ll talk about all of them in this article.
Note: This article is about running an already trained, ready-to-use LLM, not about training a new model or even about fine-tuning a model.
Is it possible to run a LLM on your machine?
The short answer is yes. The long answer is yes, kind of.
LLM stands for Large Language Model, there are many differences between models: how are they trained, how are they fine-tuned, and most importantly, how big are they.
When you query an LLM, the entire model needs to be loaded into memory, either VRAM(on GPU cards) or RAM. You can load LLMs that don’t fit in your machine (V)RAM because the OS will use swap memory (SSD/HDD space) but the performance will be terrible.
Bigger models are better at understanding the context and generating more coherent responses. But these models will not fit in your machine’s memory.
There are different strategies to reduce the size of a model while reducing the performance only slightly. All model creators usually provide various sizes of the same model because using a smaller model is cheaper and faster to use. People are supposed to:
- Regularly use the smallest model for most of their needs.
- And use the bigger model only occasionally when the LLM needs to solve a more complex problem (that cannot be solved by the smaller model.)
On our machines, we can only hope to run the smallest models.
What hardware do you need?
The good news is that you run a LLM on virtually any machine. Anything from a Raspberry Pi to a powerful desktop PC with a pair of NVidia GPUs will do.
The most important aspect is the amount of memory VRAM or RAM you have.
A computer with a minimum of 8GB of RAM can run a small model, but realistically you’ll need a computer with at least 16GB of RAM to hope for decent performance. If you want the best, a desktop with a 32GB NVidia GPU is the thing you need.
Even a good laptop like a MacBook Pro or a Dell XPS with 16GB of RAM will be able to run a decent model with decent performance.
What is decent performance?
It means three things:
- The computer is still responsive while the model is running (this means that not all RAM is used by the model, the other apps can still use some RAM)
- The model responds quickly enough (this is measured in tokens/second, i.e. how many words the model can generate in a second, to be useful the model should generate at least 10 tokens/second.)
- The quality of the responses is good enough (this is subjective, but the model should generate coherent responses.)
In the end, the best way to know the limits of your machine is to run several models and find the best option for your constraints. How to do this? We’ll talk about this in the next section.
What software do you need?
There are some pieces of software called “LLM managers”. They can be used to download and run LLMs on your machine.
Note: In some places, you’ll see the term “LLM inference”. It just means using the LLM to generate an answer to a query. “CPU inference” means that the LLM is running on the CPU to generate an answer, and “GPU inference” means the LLM is running on the GPU.
Here are some popular LLM managers:
I’ll use Ollama for exemplification but feel free to use any of the above.

First, you need to install the software. Go to the LLM manager’s website and follow the instructions to download and install it.
Next is the important part: choosing the model.
What models can you run?
LLM managers have a list of models that can be run on your machine using the manager.
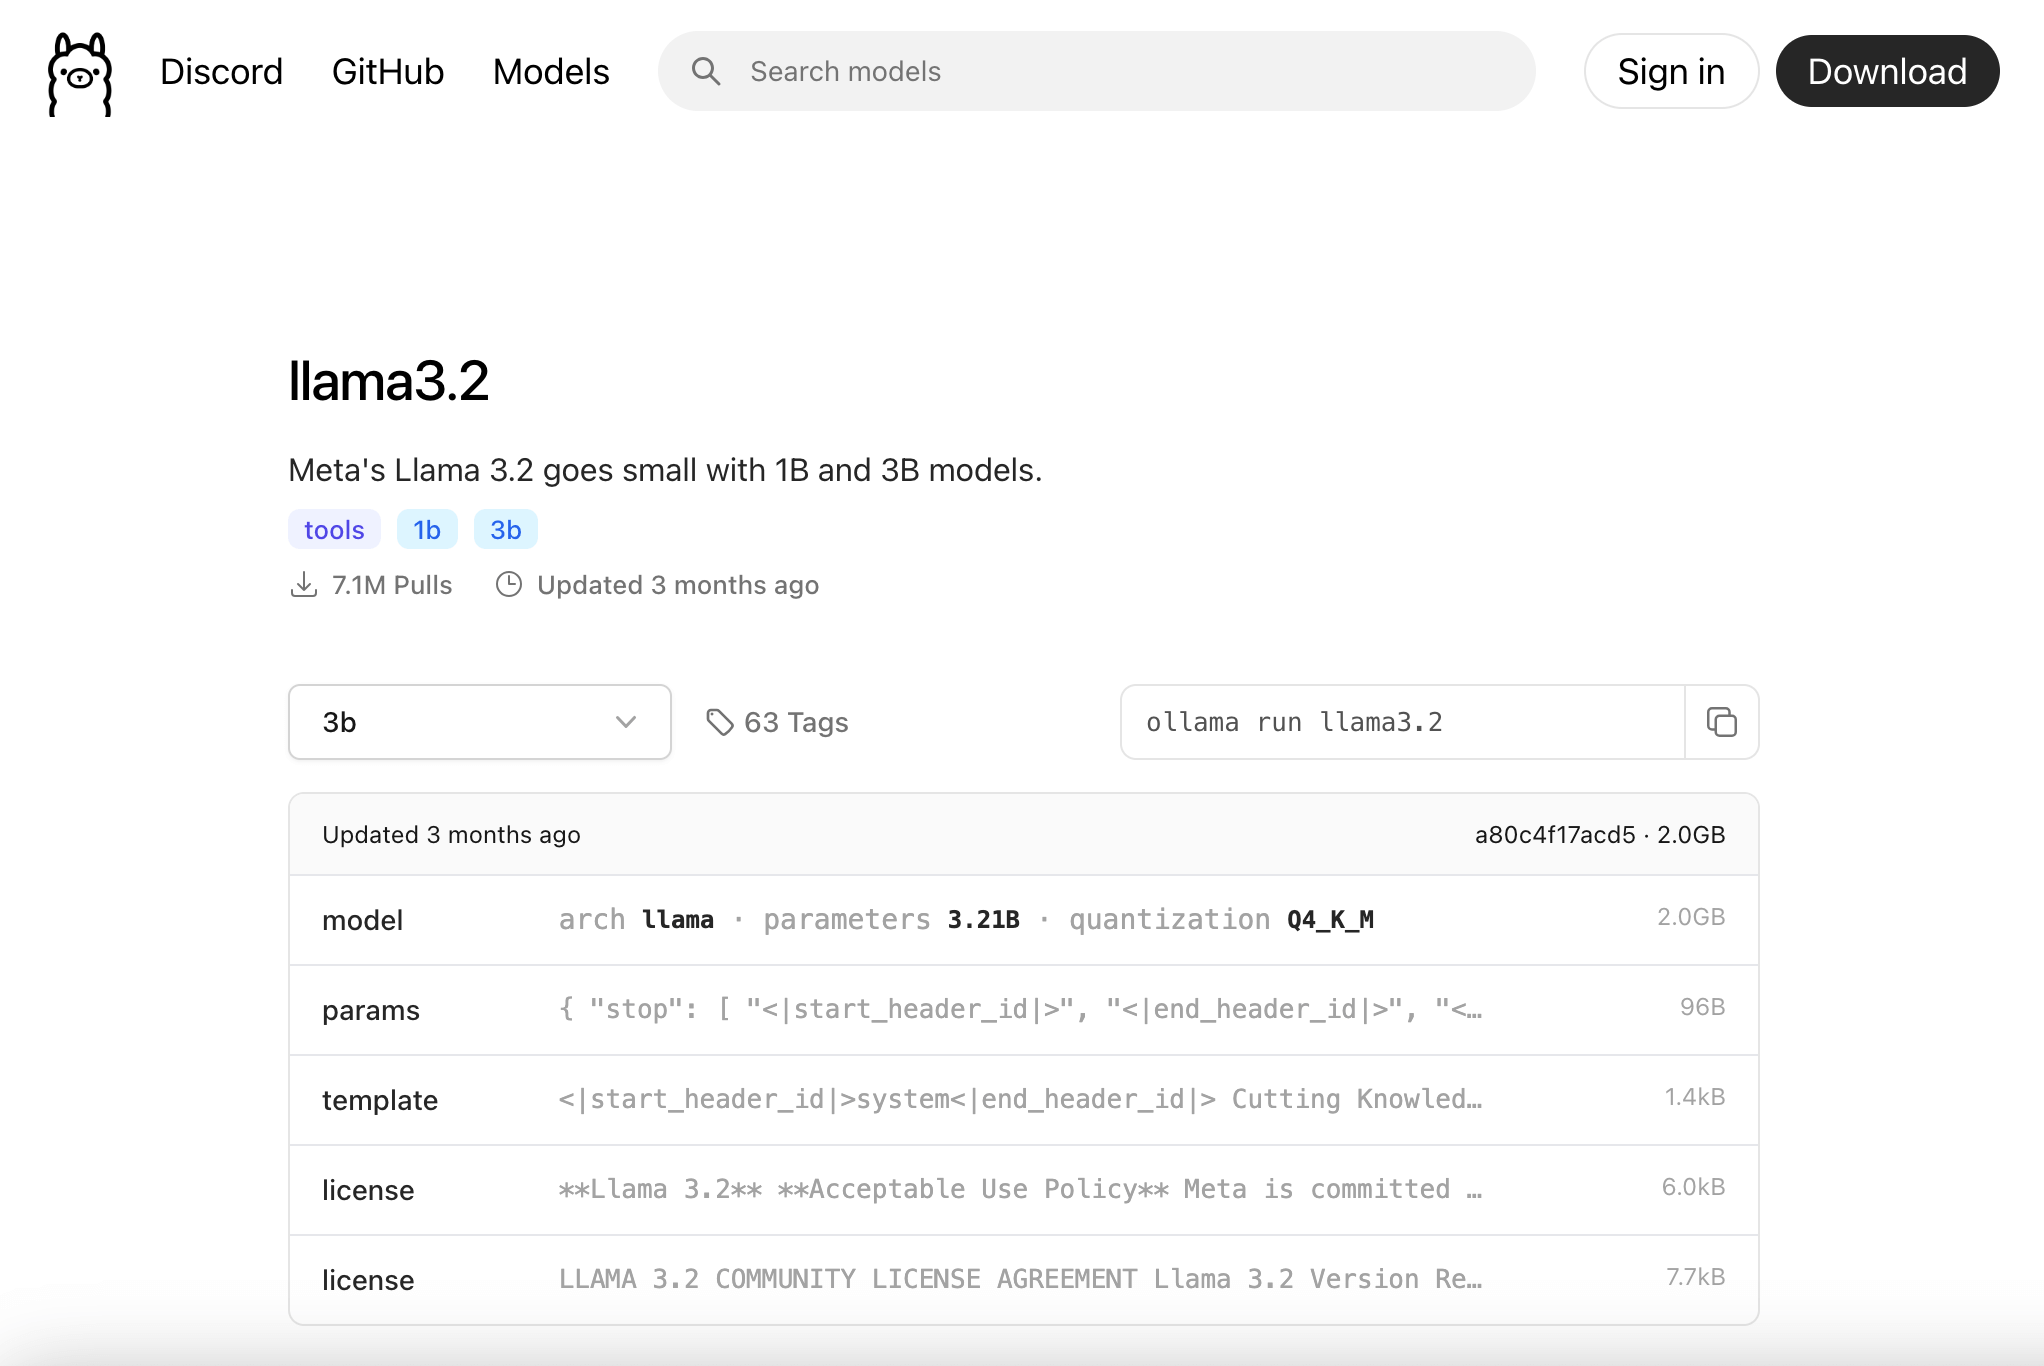
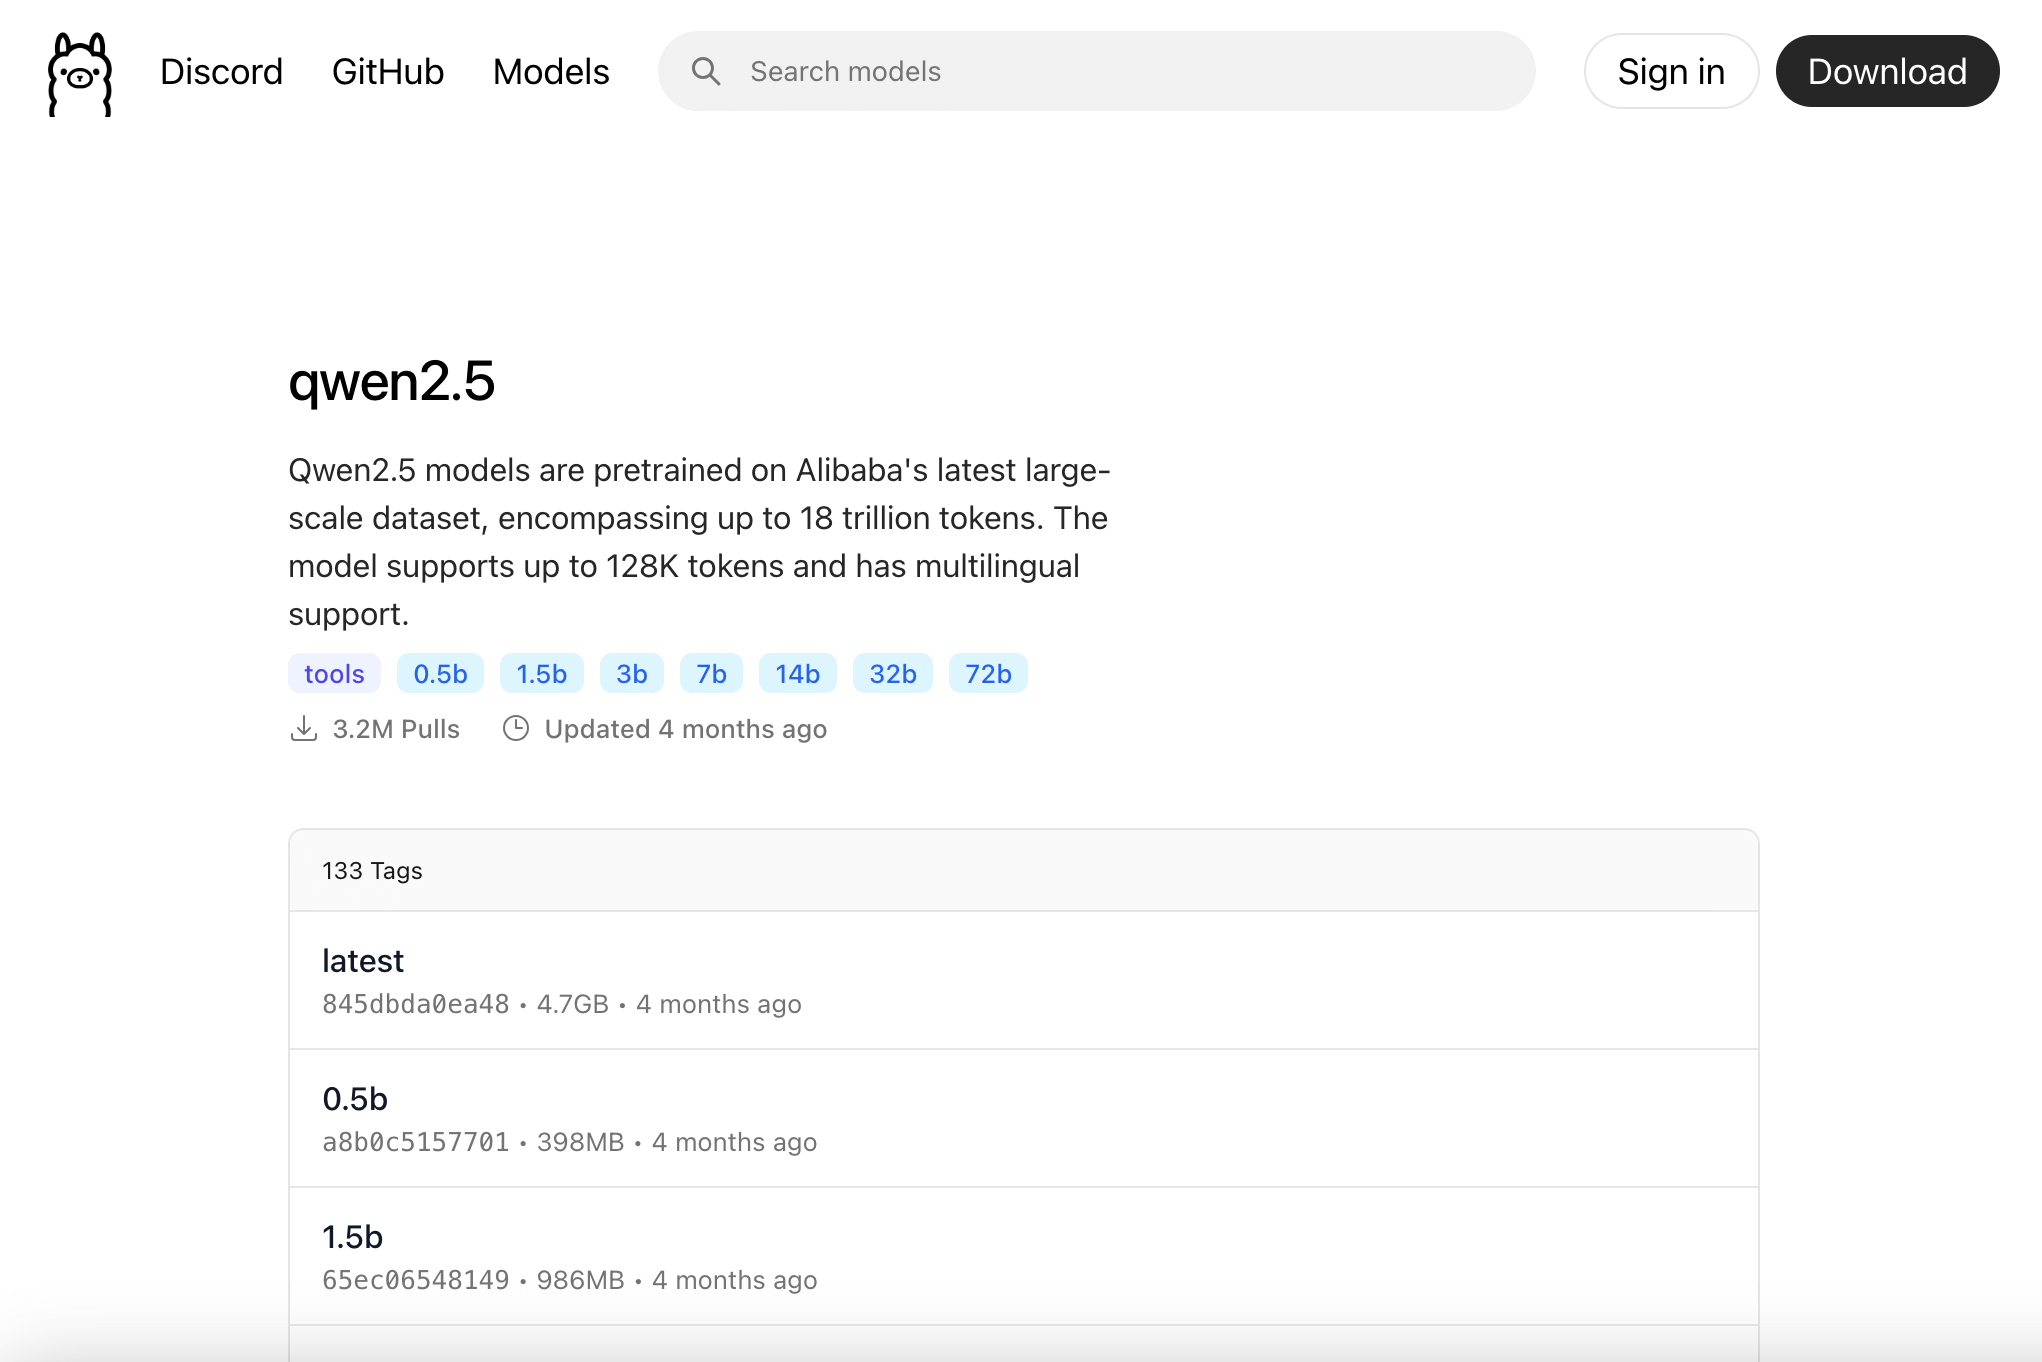
Here are some examples from Ollama’s website:
- llama3.3
- 70b parameters | 43GB size | Q4_K_M quantization
- llama3.2
- 1b parameters | 1.3GB size | Q4_K_M quantization
- 3b parameters | 2GB size | Q4_K_M quantization
- phi4
- 14b parameters | 9.1GB size | Q4_K_M quantization
- qwen2.5
- 0.5b parameters | 398MB size | Q4_K_M quantization
- 1.5b parameters | 986MB size | Q4_K_M quantization
- 3b parameters | 1.9GB size | Q4_K_M quantization
- 7b parameters | 4.7GB size | Q4_K_M quantization
- 14b parameters | 9GB size | Q4_K_M quantization
- 32b parameters | 20GB size | Q4_K_M quantization
- 72b parameters | 47GB size | Q4_K_M quantization

Some models are available in multiple sizes, some are available in a single size.
In general, the more parameters the model has (1 billion, 3 billion, 70 billion, etc.) the better the model is. So start from the model with most parameters and go down until you find one that fits on your machine’s memory.
For example, if I have a machine with 16GB of RAM I can try the following models:
- llama3.2 3b parameters (2GB size)
- phi4 14b parameters (9.1GB size)
- qwen2.5 14b parameters (9GB size). Maybe test 32b one too, just to see if the performance is acceptable for you.
All things being equal, I would probably test “phi4” and “qwen2.5” because they have more parameters and are probably better models.
Maybe you have heard that OpenAI’s GPT 3 has 175 billion parameters. Or that GPT 4 has 1.8 trillion parameters. If you hoped to run a model like this on your machine, I’m sorry to disappoint you. Those models are too big to run on any machine.
Quick note on Q4_K_M quantization
All the above models feature a Q4_K_M quantization. To reduce its size, the model is compressed using a technique called quantization. This technique reduces the size of the model while keeping the performance almost the same. Q4_K_M is considered the best (keeping the max performance), but it is not the only quantization available.

Some models are provided in multiple quantizations, meaning they have different sizes. For example, qwen2.5 32b is provided among others as:
- 32b-instruct-q2_K • 12GB
- 32b-instruct-q3_K_L • 17GB
- 32b-instruct-q3_K_M • 16GB
- 32b-instruct-q3_K_S • 14GB
- 32b-instruct-q4_0 • 19GB
- 32b-instruct-q4_K_S • 19GB
So it looks like a good idea to me to also test a qwen2.5 32b model like 32b-instruct-q3_K_M or 32b-instruct-q2_K that could fit in my machine’s 16GB RAM.
Note: Some models have “instruct” word in them meaning they were trained for chat. Some have “text” word or no extra word at all, meaning they are base models, which can only continue a text.
Install a model
First, check if Ollama was installed correctly by running ollama --help in the terminal.
ollama --help
If you get command not found: ollama the installation was not successful.
Next, install a model, for example, llama3.2 3b parameters (2GB size) by running in the terminal:
ollama pull llama3.2
This will download the model and install it on your machine. To check if the model was installed correctly run:
ollama run llama3.2
Now you can use the model, ask it questions, and get answers:
>>> What is your cut-off date?
My knowledge cutoff date is December 2023. This means that my training data only goes up
until December 2023, and I may not have information on events, developments, or updates
that have occurred after this date. If you need information on very recent events or
developments, I may not be able to provide the most up-to-date information.

>>>/bye
To end the chat type /bye.
To check how many tokens per second the model can generate, start ollama with --verbose flag:
ollama run llama3.2 --verbose
At the end of a response, ollama will include the following information:
total duration:       8.128815028s
load duration:        28.671042ms
prompt eval count:    203 token(s)
prompt eval duration: 386ms
prompt eval rate:     525.91 tokens/s
eval count:           97 token(s)
eval duration:        7.711s
eval rate:            12.58 tokens/s
Models are big, so in case you want to remove a model from your machine, use the rm command:
ollama run llama3.2
How to build a simple interface
In case we want to use something more fancy than a terminal, Ollama provides an API that can be used to chat with the LLM.
The API is available at http://localhost:11434/api/chat and can be called using a POST request with the JSON payload that includes the model and the message:
{
  "model": "llama3.2",
  "messages": [
    {
      "role": "user",
      "content": "Hi"
    }
  ]
}
By default, the API will return a stream of JSON objects. The stream must be decoded before it can be used. Here is how I use Javascript to handle the Ollama API stream:
// keeps all messages, both human and AI-generated for chat history
const messages = [];
// initially it includes only the user message
messages.push({
  "role": "user",
  "content": "Why is the sky blue?"
})

const payload = {
  model,
  messages
}

try {
  const response = await window.fetch('http://localhost:11434/api/chat', {
      method: 'POST',
      cache: 'no-cache',
      body: JSON.stringify(payload)
  })

  // keeps the steaming messages in a readable format
  let buffer = '';

  const reader = response.body.getReader();
  while (true) {
    // wait on the next chunk of data
    const { done, value } = await reader.read();
    // create a text decoder
    const textDecoder = new TextDecoder();
    // decode the chunk of data
    const decoded = value && textDecoder.decode(value);
    if (done) {
      // Do something with last chunk of data then exit reader
      return;
    }
    // decoded data is a JSON object
    const json = JSON.parse(decoded);

    // in case of an API error, JSON contains an error message
    if (json.error) {
      return;
    }
    // when the stream is finished, JSON contains a done=true field
    if (json.done) {
      const { eval_count,eval_duration, context } = json;
      convoContext = context;
      // we can calculate the tokens per second only when the stream is done
      const tps = eval_count / eval_duration * 10**9;
    }

    // add the AI messages to the chat history
    messages.push(json.message);

    // add the messsage content to the buffer
    buffer += json.message.content;

    // Optionally convert the buffer to HTML because the response can contain markdown
    // for this you'll need to include the showdown library (e.g. from a CDN load https://cdn.jsdelivr.net/npm/showdown@2.1.0/dist/showdown.min.js)
    const converter = new showdown.Converter();
    const htmlBuffer = converter.makeHtml(buffer);
  }
}
catch(e){
  console.log('Error', e)
}
Another useful API is the one that returns the available models at http://localhost:11434/api/tags:
const response = await window.fetch('http://localhost:11434/api/tags');
// get JSON response
const models = await response.json();
models.models.forEach(m => {
  // do something with the models
  console.log('Model name:', m.name);
})
For more APIs or details take a look at the Ollama API Docs.
Example
Let’s create an index.html page that calls the API:
<html>
 <head>
 	<script type="text/javascript" src="https://cdn.jsdelivr.net/npm/showdown@2.1.0/dist/showdown.min.js"></script>
 	<style>
		body {
			font-family: -apple-system, BlinkMacSystemFont, "Segoe UI", Roboto, Oxygen-Sans, Ubuntu, Cantarell, "Helvetica Neue",sans-serif;
			display: flex;
			flex-direction: column;
			height: 100%;
			margin: 0;
			background: #333;
			color:#fff;
		}
		pre {
			background: #111;
			padding: 1rem;
			overflow: auto;
		}
		section {
			flex-grow: 1;
			max-width: 600px;
			width: 100%;
			margin: 0 auto;
			display: flex;
			flex-direction: column;
			justify-content: flex-end;
			padding-bottom: 140px;
		}
		article {
			padding: .5rem;
			line-height: 1.4;
		}
		article.human{
			font-weight: bold;
		}
		article p:first-child{
			margin-top: 0;
		}
		form, div {
			max-width: 600px;
			width: 100%;
			padding: 1rem;
			margin: 0 auto;
			display: flex;
			gap:1rem;
		}
		.convo{
			font-size: .8rem;
			color: #888;
			text-align: center;
			justify-content: center;
			padding: 0;
			margin-top:1rem;
		}
		.convo select{
			background: transparent;
			color: inherit;
		}
		input, button {
			font-family: inherit;
			font-size: 1rem;
			padding: .5rem;
			border-radius: 8px;
			border:1px solid #858585;
			background: #111;
			color:#fff;
		}
		input {
			flex-grow: 1;
		}
		footer {
			position: fixed;
			bottom: 0;
			width: 100%;
		}
		.loader {
		  width: 10px;
		  margin-left: 0;
		  --gradient: no-repeat radial-gradient(circle closest-side,#fff 90%,#fff0);
		  background:
		    var(--gradient) 0%   50%,
		    var(--gradient) 50%  50%,
		    var(--gradient) 100% 50%;
		  background-size: calc(100%/3) 20%;
		  animation: dots 1s infinite linear;
		}
		@keyframes dots {
		    20%{background-position:0%   0%, 50%  50%,100%  50%}
		    40%{background-position:0% 100%, 50%   0%,100%  50%}
		    60%{background-position:0%  50%, 50% 100%,100%   0%}
		    80%{background-position:0%  50%, 50%  50%,100% 100%}
		}
 	</style>
	<script>
		let model = '';
		const messages = [];

		function updateModel(e) {
			model = e.target.value;
			console.log(model);
		}

		async function handleSubmit(e){
			e.preventDefault();
			callOllama();
		}
		async function callOllama() {
			const prompt= document.querySelector('#prompt')?.value;
			document.querySelector('#prompt').value = '';
			console.log('Calling Ollama..'+prompt)

			const userPrompt = document.createElement('article');
			userPrompt.className = 'human';
			userPrompt.innerHTML = prompt;
			document.querySelector('#chat').appendChild(userPrompt);

			messages.push({
				"role": "user",
				"content": prompt
		    })
			const payload = {
				model,
				messages
			}

			const spinner = document.createElement('div');
			spinner.className = 'loader';
			document.querySelector('#chat').appendChild(spinner);

			try {
				const response = await window.fetch('http://localhost:11434/api/chat', {
					method: 'POST',
					cache: 'no-cache',
					body: JSON.stringify(payload)
				})

				document.querySelector('#chat').removeChild(spinner);

				const responseElement = document.createElement('article');
				responseElement.className = 'ai';
				document.querySelector('#chat').appendChild(responseElement);
				responseElement.scrollIntoView()

				const reader = response.body.getReader();
				let buffer = '';
				while (true) {
				    const { done, value } = await reader.read();;
				    const textDecoder = new TextDecoder();
				    const decoded = value && textDecoder.decode(value);
				    if (done) {
				      // Do something with last chunk of data then exit reader
				      return;
				    }
				    const json = JSON.parse(decoded);
				    console.log(json);
				    if(json.error) {
				    	responseElement.innerHTML = 'Oh no! Panic. Something went wrong'
				    	return;
				    }
				    if(json.done) {
				    	const { eval_count,eval_duration, context } = json;
				    	convoContext = context;
				    	const tps = eval_count / eval_duration * 10**9;
					    document.querySelector('span').innerHTML = tps.toFixed(2)+' ths';
				    }
				    messages.push(json.message);
				    buffer += json.message.content;
				    const converter = new showdown.Converter();
				    responseElement.innerHTML = converter.makeHtml(buffer);
				}
			} catch(e){
				console.log(e);
				const responseElement = document.createElement('article');
				responseElement.className = 'ai';
				responseElement.innerHTML = 'Oh no! Panic.'
				document.querySelector('#chat').appendChild(responseElement);
			}
		}


		async function getModels() {
			const response = await window.fetch('http://localhost:11434/api/tags');
			const models = await response.json();
			model = models && models.models[0] && models.models[0].name;
			console.log('Set model to', model);
			models.models.forEach(m => {
				let name = m.name;
				const option = document.createElement('option')
				option.name=name;
				option.value=name;
				option.innerHTML=name;
				document.querySelector('#models').appendChild(option);
			})
		}
		getModels()
	</script>
 </head>
 <body>
 	<section id="chat">

	</section>
	<footer>
		<div class="convo">
			Conversation with <select id="models" onchange="updateModel(event)"></select>
			<span></span>
		</div>
	 	<form onsubmit="handleSubmit(event)" method="POST">
			<input type="text" value="Hi" id="prompt"></textarea>
			<button>Send</button>
		</form>
	</footer>
 </body>
</html>
Run the following command in the terminal, same folder with index.html:
npx http-server
Open the browser at http://localhost:8080 and you’ll see a chat interface that can be used to chat with the LLM.
Here is how it looks in action:
Conclusion
Running LLMs on your machine is a safe way to use AI in your projects. While you can’t run locally the best models, it’s still possible to run decent models even on laptops.
The performance of the models can be good enough for most of the tasks, and the quality of the responses can be good enough for most cases.
And when the local models are not good enough, you can always use the best models online.